Showing posts with label textiles. Show all posts
Monday, February 10, 2014
3D Letters
I made this for a friend's birthday, it is made from 6 layers of foam board, stuck together, then covered in newspaper and PVA glue.
I laid the material on with double sided sticky tape, to ensure that I could reposition if need be and to ensure that the fabric wasn't ruined with glue.
Wednesday, January 16, 2013
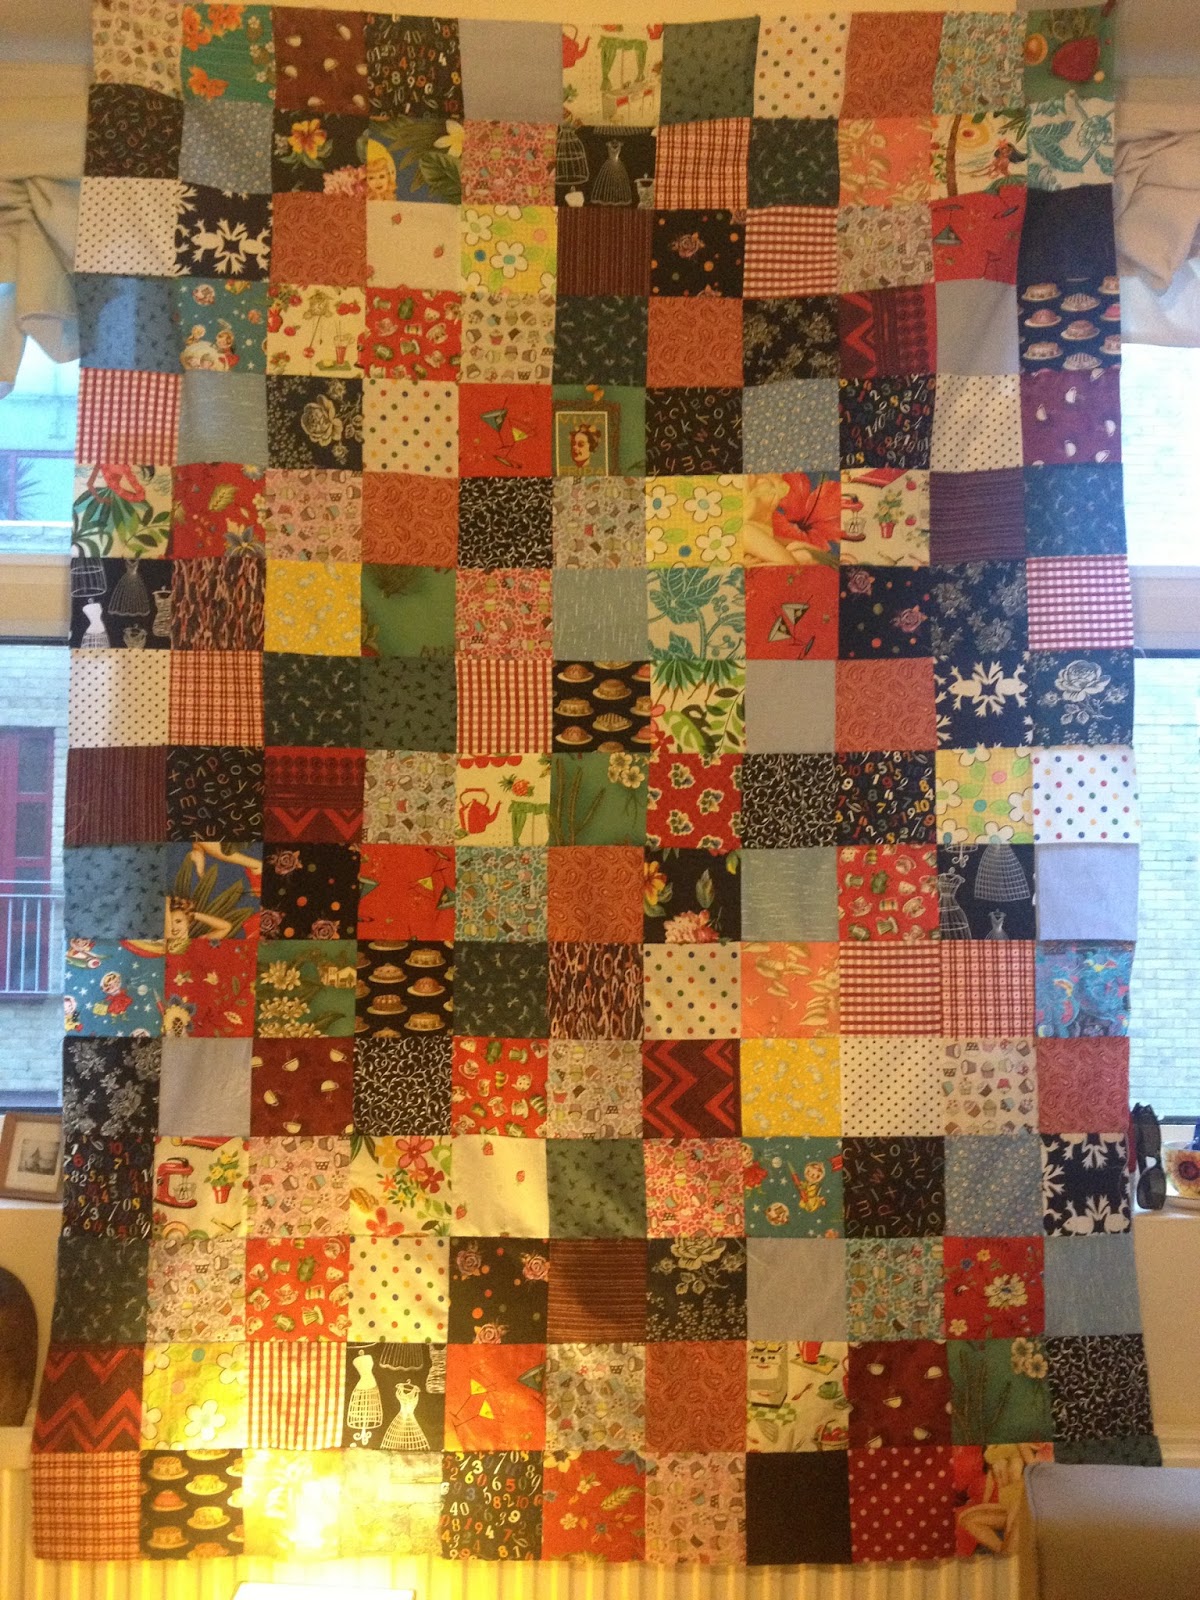
Quilt No.2
I've finally sewn all of the squares for 'quilt two' together but I've now lost my quilting wind and therefore have frozen, I'm sure it'll come back, it always does. Probably during the height of summer, as there really is nothing worse then sewing a quilt top to the wadding and backing during hot days, but when the wind strikes, you just got to sew.
If the recipients of this blanket are lucky, they may get it before their first wedding anniversary, unlike the recipients of the First Quilt. It's not about the delivery date, it's about the love which is given while making it, hence the lack of energy and ability and the duration for making one, honest, honest it is.
OK, maybe I'm just impatient and like to change my projects often and due to that, I apologise to the lucky recipients, when it is finished. Along with the other three which haven't even been thought about yet...I'm going to stop giving them as presents, as I'm crap at quilting.
Thursday, December 20, 2012
Christmas Stockings
I've been extremely lethargic lately, work has been crazy and all I seem to do outside of work is sleep. Personally, I'm looking forward to a calmer time, if such a thing exists.
But, due to the beloved festive period being here, today I have sewn some stockings for my two god-daughters, admittedly they won't get to enjoy the splendour this year, but next year, Christmas should be pretty epic for them...yep, that is right, I am going to claim that these stockings will change their future Christmas experiences!
These particular stockings are made from Moda's 2011 Christmas range, with a plain white lining.
Saturday, October 13, 2012
Quilt No.1 Making
| I've had to change the colours slightly, so you can see the pattern, as it's a light jade on cream. |
The thing about making a quilt is that it's a very personal thing. It doesn't just keep you warm, you can also dress your home, so you need to ensure it's in keeping with how the people you're giving it too, might dress their home. Or maybe I'm thinking too much?!
These two particular people have a Classic, Country, Parisian, Sleepy City Suburbs style. The girl is vintage and calm colours, the guy is good suits and shiny shoes.
| My initial lay out for the quilt |
There are only 40 squares in a pack, at approx. £15, bearing in mind of the salvage, that only covers 2.5ft by 2.5ft, roughly. Which won't make a single quilt of 6ft by 4ft.
Luckily I had various flowery patterns in similar colours, so I cut additional squares up and started to lay them out in a satisfactory pattern, where none of them seemed to clash.
I started to sew my 4 squares into square formations and realised, I was going to need loads more material, bloody hell, it's gonna cost a fortune! I head back to Beyond Fabrics and found some fantastic new materials with little swirls on them...perfect!
I then needed to extend it length ways and found some neutral materials in my box, to add in. This is when I made a huge mistake, I mismatched two materials, then added a strip of plain either side, it looked shit! Cue lots of unpicking...the joys of sewing!
I set about cutting and sewing to break them all up and added my strips to the strip of squares and borders.
It's been suggested that I should have made a plan to begin with, or have used a pattern, but it's not how I fly. Yes it might have made life easier, but it wouldn't have been so much fun! If you've a logical brain, get an idea of what you'd like it to look like and set about it...I wanted squares, the borders were a last minute requirement that set it off nicely.
| My lazy quilting... |
Also, I bailed on actual quilting, lazy of me, I know. I did little square stitches in the middle of the squares and left tassles on the reversed side.
|
I will try harder in the future on the actual quilting part, as I'm soon to embark on another quilt. This time it's brightly coloured with lots and lots of squares, I'm still collecting the material for the quilt top, I'm worried that I'm loosing my mind, as I'm seeing every item of my wardrobe as potential material.
Tuesday, September 20, 2011
Etsy...
I've set up my own Etsy shop, finally.
Up there, I've loaded two baby mats.
I was unsure about the pricing, but I've been fair to cover costs and a small profit, minus my time.
I've been advised that Not on the High Street, is also good, but I'd rather not list the same items in two places. I'll try my luck with Etsy and we'll see what happens. It's all quite exciting.
In my lifetime, I've sold a handbag to a friend of a friend years ago, but I've never sold anything to a stranger. I've always given things as gifts. It seems rather bizarre to be selling items, but also so very exciting. That is of course, if anyone buys them. Well, in fact, regardless of people buying them, it's still exciting!
Up there, I've loaded two baby mats.
I was unsure about the pricing, but I've been fair to cover costs and a small profit, minus my time.
I've been advised that Not on the High Street, is also good, but I'd rather not list the same items in two places. I'll try my luck with Etsy and we'll see what happens. It's all quite exciting.
Wednesday, September 14, 2011
Dress Making
My friend Simone lives in LA and works for Alexander Henry Fabrics, every time she comes to visit, she brings me little gifts from their collections. This time, she brought me the fabric I used in the dress below, and the Frida Khalo fabric, to the right. Isn't it gorgeous, it's a deep turquoise, very vibrant and just purely adorable. Being given a couple of yards of both, was a dream come true. I love you Simone.
I had a hen do last weekend and due to being unemployed, I needed to conserve money, where I could. So decided that with the new fabric, I could be productive with my time and money. Out came Diana from retirement, and off I set. I measured the booby triangles, sewed them together. Cut four lengths of material, sewing two of them end to end, folding the edges over and ironing, then placed and sewed the boobs in place.
Then I cut the lengths of the skirt and gathered them to be the correct size and sewed them in place. I was hoping to have a small open back to the skirt, but failed. I had far too much material, oops! I hemmed from 6 inches below the belt, and then sewed it all together and hemmed it. I also sewed the belt up properly. Made a quick couple of straps for the top half and popped them into the tops of the triangles.
Basically, it was really easy and took me about 4 hours to make. Isn't it cute!
It worked out really well, until about 1am, when one of my straps popped off, not so great! But all in all, it was fab and I was extremely proud to be wearing my own design. I'm extremely tempted to make a couple of summer tops in a similar style now.
Plus, I've been sewing for about 15 years now, and I've only just found out how to gather material through stitches. I guess it's true what they say, you're never too old to learn.
I had a hen do last weekend and due to being unemployed, I needed to conserve money, where I could. So decided that with the new fabric, I could be productive with my time and money. Out came Diana from retirement, and off I set. I measured the booby triangles, sewed them together. Cut four lengths of material, sewing two of them end to end, folding the edges over and ironing, then placed and sewed the boobs in place.
![]() |
| Eton Butterfly Print |
Basically, it was really easy and took me about 4 hours to make. Isn't it cute!
It worked out really well, until about 1am, when one of my straps popped off, not so great! But all in all, it was fab and I was extremely proud to be wearing my own design. I'm extremely tempted to make a couple of summer tops in a similar style now.
Plus, I've been sewing for about 15 years now, and I've only just found out how to gather material through stitches. I guess it's true what they say, you're never too old to learn.
Wednesday, August 17, 2011
Birthday Bunting
I really like making bunting. I've made loads in my time, this string were for my friend's birthday last year. Previously, I've made pink bunting, and for some reason, when I make it, I appear to go over the top and make miles of the stuff. The pink string are about 10 metres long. This one is about 8m, or more?!
My friend recently commissioned me to make some for her pub, so I set about making sexually neutral (yes, there is such a thing) bunting. It's made from my scraps box, which cleared out a huge amount of material, and in typical fashion I made two lengths of 13 metres. Opps! What can I say, I really enjoy making bunting. Or should I say, I really like my sewing machine and the relationship I have with it.
If anyone would like to commission some bunting; if you've a scraps box you'd like me to use, or just a colour palette. Please email me here.
Tuesday, August 16, 2011
Baby Mats
![]() |
| Baby Rhydian & his mat |
It's simply a brightly coloured, padded mat for the baby to lie on. I use modern brightly coloured fabrics (100% cotton). The first two I made, I backed with this fabric, as I had an abundance of it (stupidly am running out now, I must restock). Recently, I've been using anything brightly coloured and fun. I love making them, so much. They are so pretty and give instant impact, visually and on a practical level.
My friends had twin girls, so I made this mat for them, it's dimensions are: 38.5" x 23". It's back with the yellow floral fabric used for two of the squares.
I'm hoping to get some up on my etsy account soon, in the mean time, if anyone would like one, I'll happily take on the commission. On average, they are 23" long and about 20" wide, but if you'd like them in a different size, colour, patterned or plain, etc. Please email me here.
Updated: April 2013
Two recent mats -
Thursday, June 16, 2011
Upholstery Funtimes Part 1
So, I'm not very good at this, I've done loads of renovations, of various kinds but have never blogged about them (well not really), so bear with me...
Once we had the flat confirmed and we'd check the size of the kitchen and what furniture we needed, we journeyed to the reclaim yard close to my parents house, Haynes of Challow, if you live anywhere near it, I recommend it, it's great! We went in to the final two sheds (leftover crap/house clearances, that no one else wants). JFo, Tom and I all scoured the place, JFo found a huge leather topped desk that she could have quite happily lived in/on, given a chance, and an antique rocking chair she had a mild love affair with.
Tom found many things he liked, most of which were out of our price range, although he did love a lampshade that was of the Victorian "World" map, it was lovely but he wouldn't buy it?!
I fell in love with everything but I have a love for poor, seatless, backless chairs that require some love, new seating, new legs, new backs, etc. Anyhow, we found four hapless said chairs at the back of a pile of other hapless chairs, and due to them all costing a total of £48, we could justify the £98 for the gorgeous fold out dining table, which has a hidden drawer and is just too charming for words.
The one with the hessian intact (see right) was easy to fix, especially as I used some gorgeous fabric from a kind friend, and I threw some new webbing in and a new cushion, for good measure. I also, put some trimming over the staples I used, yep, I totally cheated. I did however, stick the trimming on with furniture pins. I'm learning!
Once I'd got that sorted, I drapped the chosen material over the chair and started to staple accordingly, tucking the edges in for a crisp look. I found that stapling first, means you've more room to change and adapt. I mainly focused on getting the corners neat, as they have the most work to do. Once I was happy with the shape, I tacked it in place to secure the material.
Subscribe to:
Posts (Atom)